2013年1月4日 星期五

IOS下SQLite的简单使用

IOS下SQLite的简单使用

資料來源:http://www.cppblog.com/cokecoffe/archive/2012/05/31/176978.html

看着国外网站的教程,写了一个小例子,一个联系人的程序,包括 (姓名、地址、电话)三项内容,通过两个按钮,可以将信息保存或者查询数据库已有的信息。
UI就不说了,比较简单。贴一下关键代码,具体的话还是去看源代码(正想办法传,我这git出点问题)。

/*根据路径创建数据库并创建一个表contact(id nametext addresstext phonetext)*/
- (void)viewDidLoad
{
[super viewDidLoad];
// Do any additional setup after loading the view, typically from a nib.

NSString *docsDir;
NSArray *dirPaths;

// Get the documents directory
dirPaths = NSSearchPathForDirectoriesInDomains(NSDocumentDirectory, NSUserDomainMask, YES);

docsDir = [dirPaths objectAtIndex:0];

// Build the path to the database file
databasePath = [[NSString alloc] initWithString: [docsDir stringByAppendingPathComponent: @"contacts.db"]];

NSFileManager *filemgr = [NSFileManager defaultManager];

if ([filemgr fileExistsAtPath:databasePath] == NO)
{
const char *dbpath = [databasePath UTF8String];
if (sqlite3_open(dbpath, &contactDB)==SQLITE_OK)
{
char *errMsg;
const char *sql_stmt = "CREATE TABLE IF NOT EXISTS CONTACTS(ID INTEGER PRIMARY KEY AUTOINCREMENT, NAME TEXT, ADDRESS TEXT,PHONE TEXT)";
if (sqlite3_exec(contactDB, sql_stmt, NULL, NULL, &errMsg)!=SQLITE_OK)
{
status.text = @"创建表失败\n";
}
}
else
{
status.text = @"创建/打开数据库失败";
}
}

}

/*将数据保存只数据库,当按下保存按钮的时候*/

- (IBAction)SaveToDataBase:(id)sender
{
sqlite3_stmt *statement;

const char *dbpath = [databasePath UTF8String];

if (sqlite3_open(dbpath, &contactDB)==SQLITE_OK) {
NSString *insertSQL = [NSString stringWithFormat:@"INSERT INTO CONTACTS (name,address,phone) VALUES(\"%@\",\"%@\",\"%@\")",name.text,address.text,phone.text];
const char *insert_stmt = [insertSQL UTF8String];
sqlite3_prepare_v2(contactDB, insert_stmt, -1, &statement, NULL);
if (sqlite3_step(statement)==SQLITE_DONE) {
status.text = @"已存储到数据库";
name.text = @"";
address.text = @"";
phone.text = @"";
}
else
{
status.text = @"保存失败";
}
sqlite3_finalize(statement);
sqlite3_close(contactDB);
}
}

/*根据输入的姓名来查询数据*/
- (IBAction)SearchFromDataBase:(id)sender
{
const char *dbpath = [databasePath UTF8String];
sqlite3_stmt *statement;

if (sqlite3_open(dbpath, &contactDB) == SQLITE_OK)
{
NSString *querySQL = [NSString stringWithFormat:@"SELECT address,phone from contacts where name=\"%@\"",name.text];
const char *query_stmt = [querySQL UTF8String];
if (sqlite3_prepare_v2(contactDB, query_stmt, -1, &statement, NULL) == SQLITE_OK)
{
if (sqlite3_step(statement) == SQLITE_ROW)
{
NSString *addressField = [[NSString alloc] initWithUTF8String:(const char *)sqlite3_column_text(statement, 0)];
address.text = addressField;

NSString *phoneField = [[NSString alloc] initWithUTF8String:(const char *)sqlite3_column_text(statement, 1    )];
phone.text = phoneField;

status.text = @"已查到结果";
[addressField release];
[phoneField release];
}
else {
status.text = @"未查到结果";
address.text = @"";
phone.text = @"";
}
sqlite3_finalize(statement);
}

sqlite3_close(contactDB);
}
}

IOS5 JSON


IOS5 JSON

IOS5.0开始支持JSON,所以不用第三方的解析了。
//Foundation(NSDictionaryNSData) 转换为JSon格式的NSData 用来发送
//+ dataWithJSONObject:options:error:

//JSON格式的Data转换为Foundation(NSDictionaryNSData)   用来解析
//+ JSONObjectWithData:options:error:

code:
https://github.com/cokecoffe/ios-demo/tree/master/HTTP


  1. 解析json成dic对象
  2. -(void)fetchedData:(NSData*)responseData {//parse out the json dataNSError* error;
  3. NSDictionary* json =[NSJSONSerialization
  4. JSONObjectWithData:responseData //1
  5. options:kNilOptions
  6. error:&error];
  7. NSArray* latestLoans =[json objectForKey:@"loans"]; //2
  8. NSLog(@"loans: %@", latestLoans); //3
  9. }
  10. 把对象生成json string
  11. //build an info object and convert to json
  12. NSDictionary* info =[NSDictionary dictionaryWithObjectsAndKeys:[loan objectForKey:@"name"],
  13. @"who",
  14. [(NSDictionary*)[loan objectForKey:@"location"]
  15. objectForKey:@"country"],
  16. @"where",
  17. [NSNumber numberWithFloat: outstandingAmount],
  18. @"what",
  19. nil];
  20. //convert object to data
  21. NSData* jsonData =[NSJSONSerialization dataWithJSONObject:info
  22. options:NSJSONWritingPrettyPrinted error:&error];
  23. //print out the data contents
  24. jsonSummary.text =[[NSString alloc] initWithData:jsonData
  25. encoding:NSUTF8StringEncoding];
  26. 添加json方法至dic
  27. @interfaceNSDictionary(JSONCategories)
  28. +(NSDictionary*)dictionaryWithContentsOfJSONURLString:(NSString*)urlAddress;
  29. -(NSData*)toJSON;
  30. @end
  31. @implementationNSDictionary(JSONCategories)
  32. +(NSDictionary*)dictionaryWithContentsOfJSONURLString:(NSString*)urlAddress{
  33. NSData* data =[NSData dataWithContentsOfURL:[NSURL URLWithString: urlAddress]];
  34. __autoreleasing NSError* error =nil;
  35. id result =[NSJSONSerialization JSONObjectWithData:data
  36. options:kNilOptions error:&error];
  37. if(error !=nil)returnnil;
  38. return result;
  39. }
  40. -(NSData*)toJSON{
  41. NSError* error =nil;
  42. id result =[NSJSONSerialization dataWithJSONObject:self
  43. options:kNilOptions error:&error];
  44. if(error !=nil)returnnil;
  45. return result;
  46. }@end
  47. 使用列子
  48. NSDictionary* myInfo =[NSDictionary dictionaryWithContentsOfJSONURLString:@"http://www.yahoo.com/news.json"];
  49. NSDictionary* information =[NSDictionary dictionaryWithObjectsAndKeys:@"orange",@"apple",@"banana",@"fig",nil];
  50. NSData* json =[information toJSON];
  51. 判断是否可json化
  52. BOOL isTurnableToJSON =[NSJSONSerialization isValidJSONObject: object]  

如何將App安裝至自己的iPhone測試


資料來源: http://fstoke.me/blog/?p=1805

前言
雖然網路上找的到很多iPhone App的教學文章,但缺乏一個簡單明瞭的Step by Step教學且絕大多數的教學都是全英文。連我原本已經設定好一次,升級OS4.0後想要重新再試一次,結果自己都忘了=.,=。所以把流程記錄下來避免自己又忘記,順便讓有心想入門iPhone App開發的人減少一點痛苦。
在一切開始之前
首先先將你要測試的iPhone手機裝上 Ad Hoc Helper 這個程式。


這個程式可以將手機的資訊寄到你指定的Email裡,我們主要是需要抓手機的Device ID,Device ID是像這樣一串的16進位編碼字串 4f635dc13835007c3xxxxxxxfa9d4e651605f092,共有40個characters。
在Mac上建立Login Certification
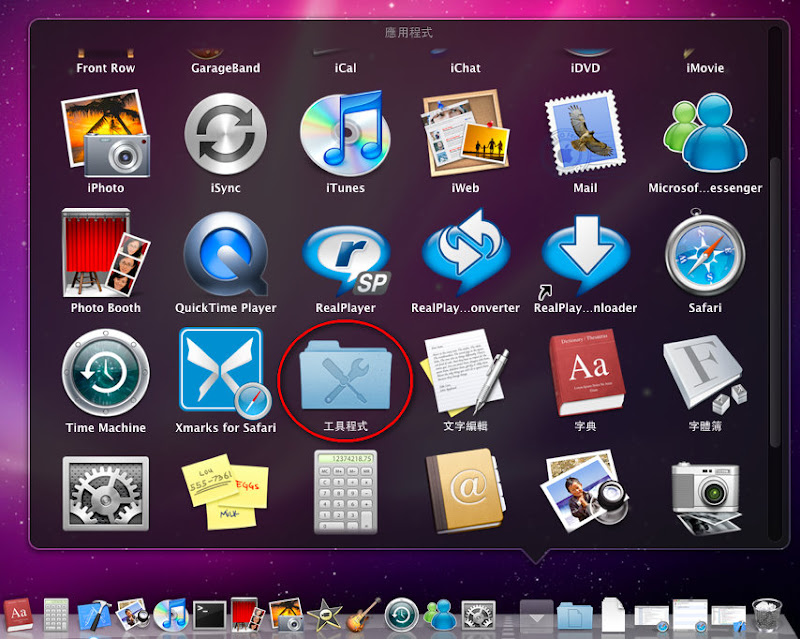
1. 開啟應用程式 → 工具程式

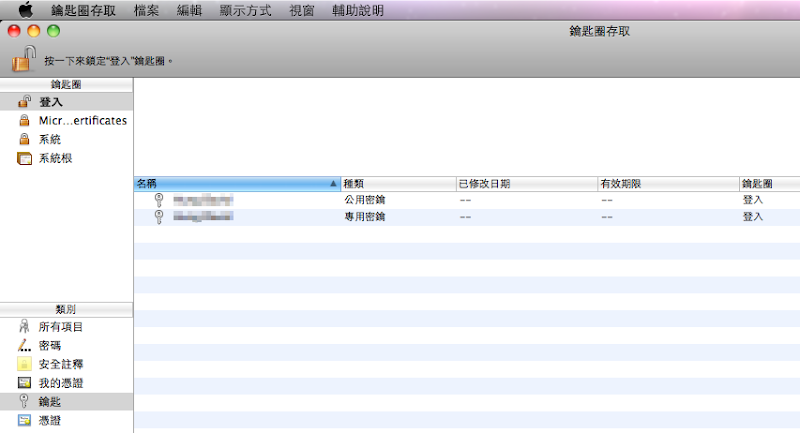
2. 點選鑰匙圈存取 (keychain)

3. 開啟 keychain 程式後,由鑰匙圈存取憑證輔助程式從憑證授權要求憑證

4. 輸入你的Email及名稱,然後勾選儲存到磁碟指定密鑰配對資訊

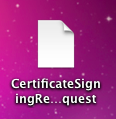
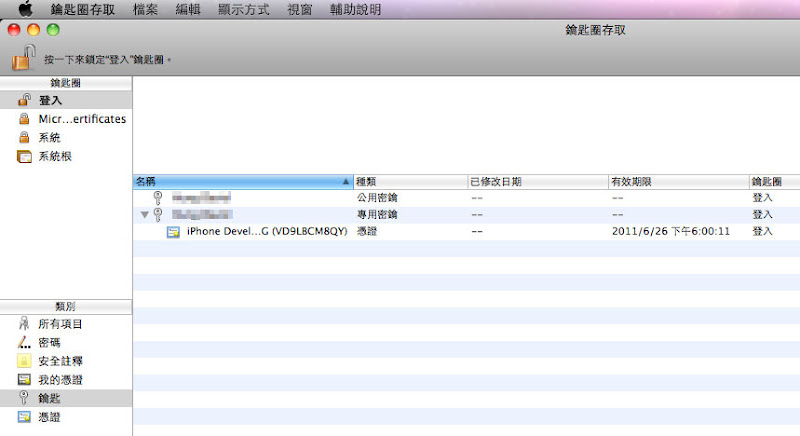
5. 完成之後就會看到多了一個 Public Key 及 Private Key,並會在桌面上產出一個名為
CertificateSigningRequest.certSigningRequest 的檔案


建立開發用憑證及App Provision
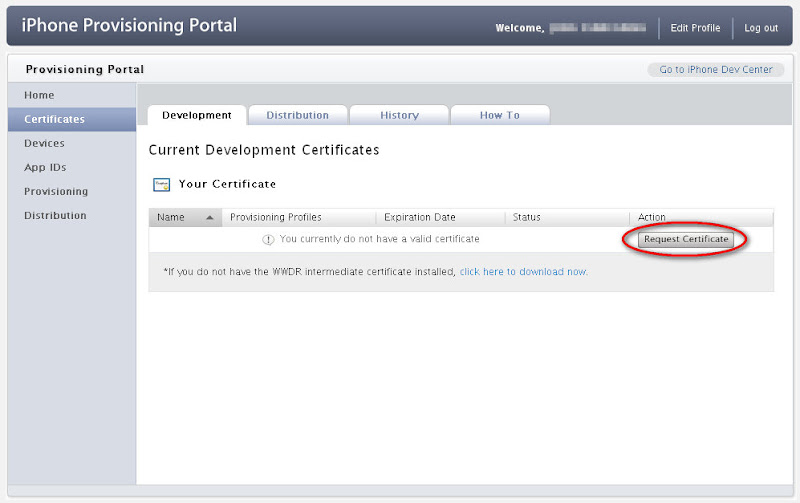
首先連到iPhone Provision Portal頁面
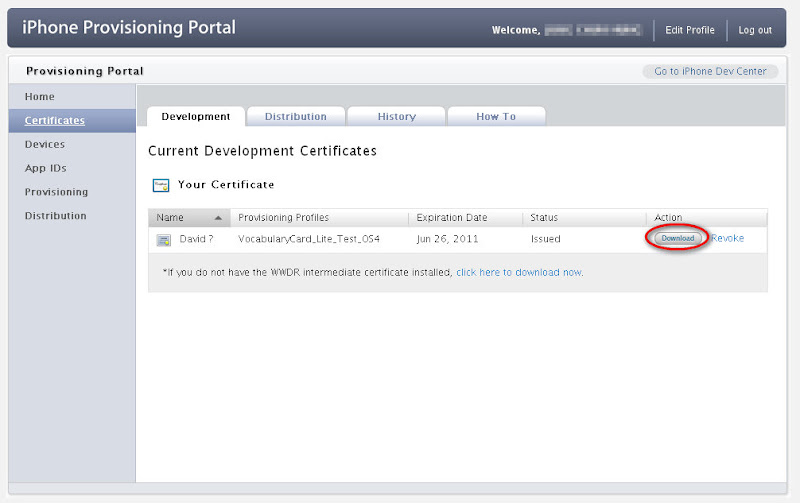
1. 建立開發用憑證。點選CertificatesDevelopmentRequest Certificate
若還沒裝過WWDR憑證(Apple Worldwide Developer Relations Certification)的話,下面那個Download連結也要點。點了之後會下載一個名為 AppleWWDRCA.cer 的檔案。
註: 如果是要正式發佈到App Store,則改成點選 Distribution頁籤

2. 點取”選擇檔案”,將剛剛在Mac上利用Keychain做出來的 CertificateSigningRequest.certSigningRequest 檔匯入

3. 匯入成功之後,就會看到已經產出了一個開發者憑證了,點選Download會下載一個名為 developer_identity.cer 的檔案

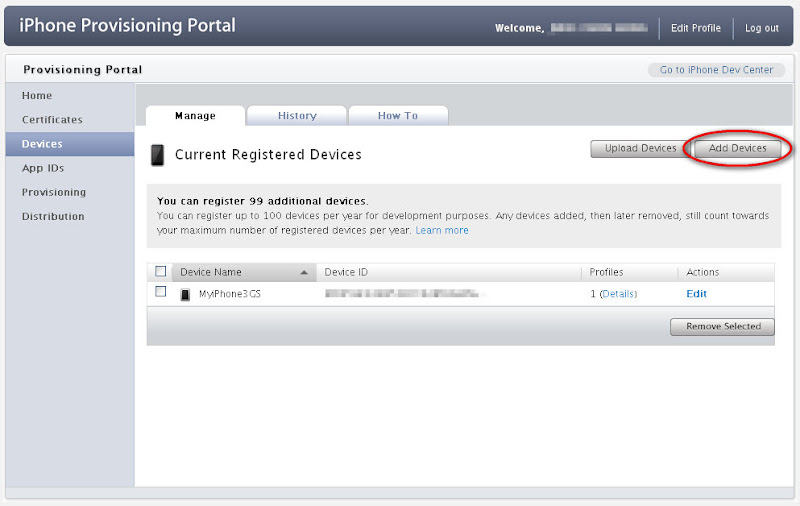
4. 建立測試Device清單。點選DevicesAdd Devices,輸入你想取的名字及Device ID。Device ID即要靠一開始提到的Ad Hoc Helper程式得到

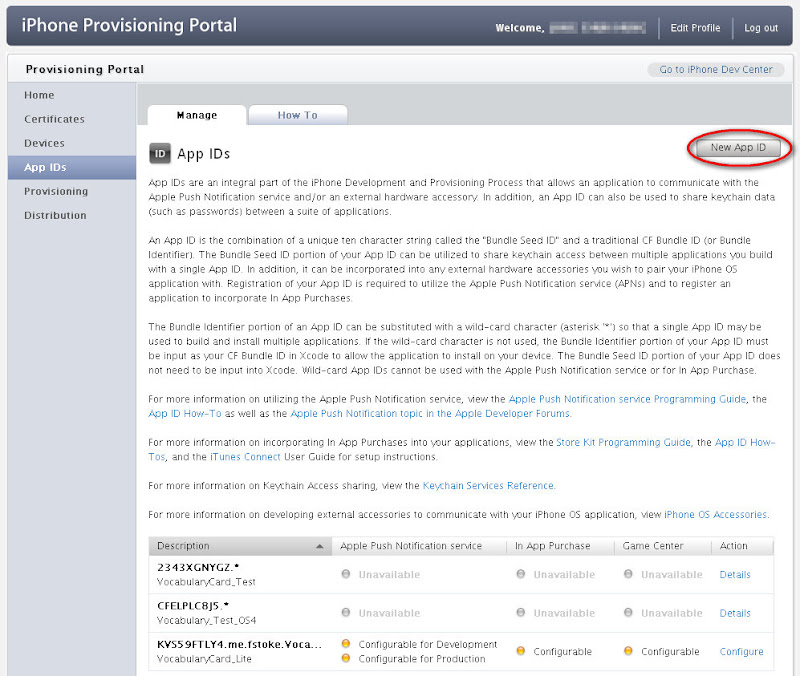
5. 建立App ID。點選App IDsNew App ID,照著表格填寫即可。請注意! 一旦建立一個App ID後,將永遠不能刪掉 (不知道以後會不會開放,Apple的說法是因為他們要留下來做記錄)。所以請不要建立太多App ID以免造成自己的困擾 (像我一樣… =.,=)

6. 建立Provision Profile。點選 ProvisioningDevelopmentNew Profile。照著表格填寫即可,建好之後點選Download會下載一個名為 [Profile Name].mobileprovision 的檔案
註: 如果是要正式發佈到App Store,則改成點選 Distribution頁籤

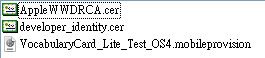
全部的動作完成之後,總共會得到如以下三個檔(或後兩個檔)。

7. double click developer_identity.cer 檔會開啟keychain,會看到已經多了一個iPhone Development的憑證。注意到上面有個Apple Worldxxx的憑證,即是 AppleWWDRCA.cer 憑證寫入的

點選Key,會看到Private Key已經與iPhone Development憑證做關聯了

8. 將你的iPhone用傳輸線接好Mac。double click [Profile Name].mobileprovision 檔,即會開啟XCode的Organizer畫面,並將Provision安裝至iPhone裡。

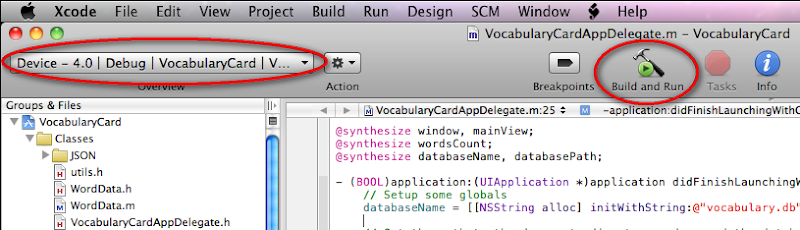
9. Okay! 一切都準備完了,接下來就是開啟XCode將App Upload到你的iPhone上去囉。執行環境選擇 Device → Run! 等它跑完… 恭喜!! 你終於可以在你的iPhone上Run你的程式囉! :smile:


資料來源: http://fstoke.me/blog/?p=1805

如何在多台機器上共享IOS證書

如何在多台機器上共享IOS證書1. 下載.cer文件到別的機器。就是在IDP上的那個。2. 從發送申請文件(certificate Request,後綴名為certSigningRequest)的機器上把證書對應的private key(.p12文件)導出,密碼自己定,要記住,後面導入的時候要用。3. 在你需要的機器上安裝證書(.cer),導入私鑰文件(.p12)。安裝對應App的provisioning profile。4. Over,你可以用其他機器開發了。


注:必須得從申請機器上導出private key.到其他機器上
一、成員介紹1. Certification(證書)證書是對電腦開發資格的認證,每個開發者帳號有一套,分為兩種:1) Developer Certification(開發證書)安裝在電腦上提供權限:開發人員通過設備進行真機測試。可以生成副本供多台電腦安裝;2) Distribution Certification(發布證書)安裝在電腦上提供發布iOS程序的權限:開發人員可以製做測試版和發布版的程序。不可生成副本,僅有配置該證書的電腦才可使用;(副本製做介紹在下面Keychain中介紹)
2. Provisioning Profile(授權文件)授權文件是對設備如iPod Touch、iPad、iPhone的授權,文件內記錄的是設備的UDID和程序的App Id,即使被授權的設備可以安裝或調試Bundle identifier與授權文件中記錄的App Id對應的程序。開發者帳號在創建授權文件時候會選擇App Id,(開發者帳號下App Id中添加,單選)和UDID(開發者帳號下Devices中添加最多100個,多選)。授權文件分為兩種,對應相應的證書使用:1) Developer Provisioning Profile(開發授權文件)在裝有開發證書或副本的電腦上使用,開發人員選擇該授權文件通過電腦將程序安裝到授權文件記錄的設備中,即可進行真機測試。注意:確保電腦有權限真機調試,即安裝了開發證書或副本;在開發工具中程序的Bundle identifier和選中使用的授權文件的App Id要一致;連接調試的設備的UDID在選中的授權文件中有記錄。2) Distribution Provisioning Profile(發布授權文件)在裝有發布證書的電腦上(即配置證書的電腦,只有一台)製做測試版和發布版的程序。發布版就是發佈到App Store上的程序文件,開發者帳號創建授權文件時選擇store選項,選擇App Id,無需選擇UDID;測試版就是在發布之前交給測試人員可同步到設備上的程序文件,開發者帳號創建授權文件時選擇AdHoc,選擇App Id和UDID;只有選中的UDID對應的設備才可能安裝上通過該授權文件製做的程序。3. Keychain(開發密鑰)安裝證書成功的情況下證書下都會生成Keychain,上面提到的證書副本就是通過配置證書的電腦導出Keychain(就是.p12文件)安裝到其他機子上,讓其他機子得到證書對應的權限。 Developer Certification就可以製做副本Keychain分發到其他電腦上安裝,使其可以進行真機測試。注意:Distribution Certification只有配置證書的電腦才可使用,因此即使導出導出Keychain安裝到其他電腦上,其他電腦也不可能具有證書的權限。

2012年11月9日 星期五

[Android]設定URL圖片給ImageView

private Bitmap myBitmap;
URL myImageURL = null;


try {

myImageURL = new URL(imageURL);

HttpURLConnection connection = (HttpURLConnection)myImageURL .openConnection();

connection.setDoInput(true);

connection.connect();

InputStream input = connection.getInputStream();

myBitmap = BitmapFactory.decodeStream(input);

}

2012年10月8日 星期一

PHP 字元轉換二、八、十、十六進位

二進位二進制(B,Binary)00000010=2
八進位八進制(O,Octal)00000010=8
十進位十進制(D,Decimalist)00000010=10
十進位十六進制(H,Hex)00000010=16


Binary 跟 ASCII互轉

 
function asc2bin($str) {
$text_array = explode("\r\n", chunk_split($str, 1));
for ($n = 0; $n < count($text_array) - 1; $n++) {
$newstring .= substr("0000".base_convert(ord($text_array[$n]), 10, 2), -8);
}
$newstring = chunk_split($newstring, 8, " ");
return $newstring;
}

function bin2asc($str) {
$str = str_replace(" ", "", $str);
$text_array = explode("\r\n", chunk_split($str, 8));
for ($n = 0; $n < count($text_array) - 1; $n++) {
$newstring .= chr(base_convert($text_array[$n], 2, 10));
}
return $newstring;
}

ASCII 與 HEX互轉
 
function asc2hex($str) {
return chunk_split(bin2hex($str), 2, " ");
}

function hex2asc($str) {
$str = str_replace(" ", "", $str);
for ($n=0; $n<strlen($str); $n+=2) {
$newstring .= pack(&quot;C&quot;, hexdec(substr($str, $n, 2)));
}

return $newstring;
}

Binary 與 HEX互轉
 
function binary2hex($str) {
$str = str_replace(" ", "", $str);
$text_array = explode("\r\n", chunk_split($str, 8));
for ($n = 0; $n < count($text_array) - 1; $n++) {
$newstring .= base_convert($text_array[$n], 2, 16);
}
$newstring = chunk_split($newstring, 2, " ");
return $newstring;
}

function hex2binary($str) {
$str = str_replace(" ", "", $str);
$text_array = explode("\r\n", chunk_split($str, 2));
for ($n = 0; $n < count($text_array) - 1; $n++) {
$newstring .= substr("0000".base_convert($text_array[$n], 16, 2), -8);
}
$newstring = chunk_split($newstring, 8, " ");
return $newstring;
}
引用:Nightmare的胡言亂語-利用PHP來做字元碼轉換(Binary、ASCII、HEX互轉)

2012年9月24日 星期一

C#窗体淡入淡出

//淡入
public int state = 0;private void f2_Load(object sender, EventArgs e)
{
this.Opacity = 0;
}
private void timer1_Tick(object sender, EventArgs e)
{
if (state == 0)
{
this.Opacity += 0.02;if (this.Opacity == 1)
{
state
= 1;
timer1.Enabled
= false;
}
}
else
{
this.Opacity = Opacity - 0.02;if (this.Opacity == 0)
{
Application.ExitThread();
}
}
}
//退出
private void f2closing(object sender, FormClosingEventArgs e)
{
e.Cancel
= true;
timer1.Start();
}